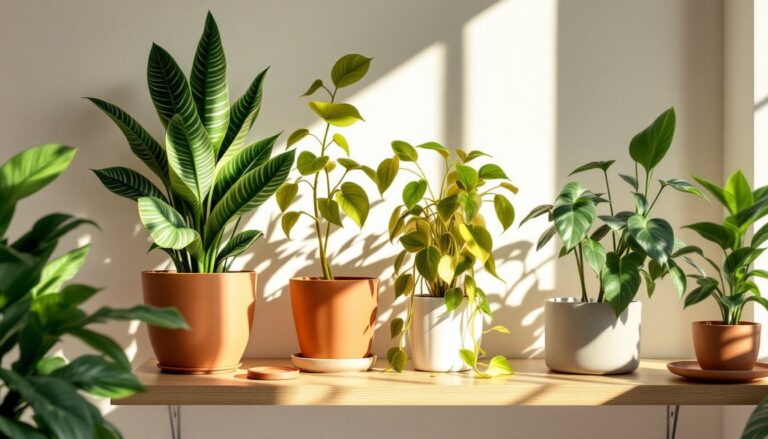
Indoor plants can struggle in rooms with limited natural light, especially during winter months or in spaces with north-facing windows. A grow light setup bridges that gap, delivering the full spectrum of light that houseplants need for photosynthesis, growth, and even flowering. Whether someone’s cultivating a collection of tropical plants or just trying to keep a fiddle-leaf fig alive, supplemental lighting can make the difference between thriving greenery and a slow decline. This guide walks through selecting the right grow lights, planning coverage, gathering equipment, and installing a system that works for any indoor garden.
Table of Contents
ToggleKey Takeaways
- A grow light setup compensates for insufficient natural light by delivering the full spectrum plants need for photosynthesis, growth, and flowering—especially important for low-light rooms and winter months.
- LED grow lights are the best choice for most home growers due to their energy efficiency, minimal heat output, long lifespan (50,000+ hours), and ability to place fixtures closer to plants (6–12 inches) without heat stress.
- Proper grow light placement follows the inverse square law: doubling the distance from the light source reduces intensity by 75%, so adjust height based on plant type (high-light plants at 6–12 inches, medium at 12–18 inches, low-light at 18–24 inches).
- A functional single-shelf grow light setup costs $100–$200 and requires minimal equipment: a fixture, adjustable hangers, digital timer, power strip, and basic mounting hardware—installation typically takes 30–60 minutes.
- Consistent light duration matters as much as intensity: most houseplants thrive on 12–16 hours daily, while a digital timer eliminates guesswork and prevents stress from erratic schedules.
- Reflective surfaces like white walls or Mylar film can boost grow light efficiency by 20–30% by redirecting stray light back toward plants, making your setup more cost-effective.
Why Your Indoor Plants Need a Grow Light Setup
Most houseplants evolved in tropical or subtropical environments where they received 10–14 hours of filtered sunlight daily. A typical indoor room provides only a fraction of that intensity, even a bright windowsill delivers roughly 1,000–2,000 foot-candles, while many plants thrive at 2,000–5,000 foot-candles or higher.
Without adequate light, plants exhibit symptoms like leggy growth (elongated stems reaching toward the nearest light source), pale or yellowing leaves, and stunted development. Flowering plants often refuse to bloom. Succulents stretch and lose their compact form.
A dedicated grow light setup solves these problems by providing consistent, high-quality light on a predictable schedule. It’s especially useful for:
- Seed starting and propagation: Seedlings need intense light immediately after germination to avoid becoming spindly.
- Low-light rooms: Basements, bathrooms, and interior spaces with no windows.
- Seasonal support: Supplementing natural light during fall and winter when daylight hours shrink.
- High-light species: Herbs, fruiting plants, and sun-loving tropicals that can’t survive on ambient indoor light alone.
Grow lights aren’t just for serious gardeners or commercial operations. A basic setup can run off a standard 120V household outlet and requires minimal ongoing maintenance beyond occasional bulb replacement and timer adjustments.
Choosing the Right Type of Grow Light
The grow light market offers three primary technologies, each with distinct advantages and trade-offs. The right choice depends on budget, space, heat tolerance, and the specific plants being grown.
LED vs. Fluorescent vs. HID Lights
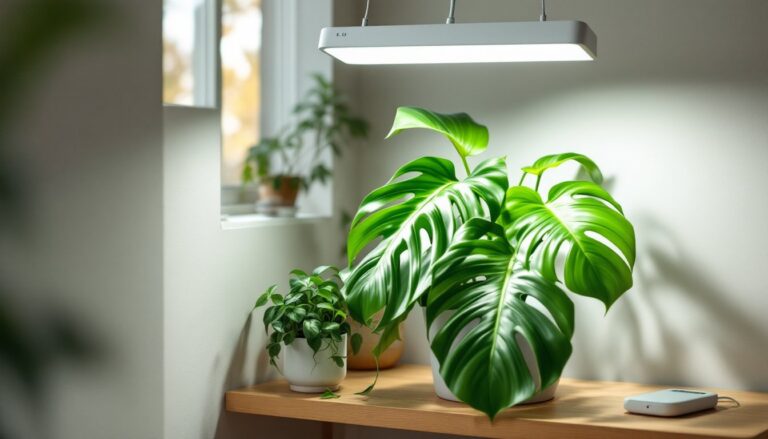
LED grow lights have become the default recommendation for most home setups. They’re energy-efficient, produce minimal heat, and last 50,000+ hours before needing replacement. Full-spectrum LEDs emit wavelengths across the visible spectrum plus some infrared and UV, mimicking natural sunlight. Panel-style LEDs work well for shelving units or small grow tents, while larger quantum board or bar-style fixtures suit bigger areas. The upfront cost is higher, expect to pay $50–$200 for a quality unit, but the long lifespan and low operating cost offset the initial investment. LEDs also let growers place lights closer to plants (often 6–12 inches) without causing heat stress.
Fluorescent lights (T5, T8, or compact fluorescent bulbs) remain a budget-friendly option for low- to medium-light plants like leafy greens, herbs, and many beginner houseplants. T5 fixtures with high-output bulbs are the best choice in this category, delivering enough intensity for vegetative growth. They run cool and fit easily under shelves or in tight spaces. But, fluorescent bulbs need replacement every 10,000–20,000 hours as output degrades, and they’re less efficient than LEDs. A four-foot, four-bulb T5 fixture typically costs $60–$120.
HID (high-intensity discharge) lights, including metal halide (MH) and high-pressure sodium (HPS) bulbs, are overkill for most home growers. They’re powerful and effective, used primarily in commercial growing operations, but they generate significant heat, consume more electricity, and require ballasts and ventilation systems. Unless someone’s running a dedicated grow room for high-light crops, HID lights aren’t practical.
For a general indoor plant collection, a full-spectrum LED panel rated at 30–50 watts per square foot of growing area provides a solid baseline. Resources like 10 Easy Pieces: Grow Lights for Indoor Plants showcase fixtures tailored to home use rather than industrial setups.
Planning Your Grow Light Placement and Coverage
Effective grow light placement depends on understanding light intensity and how it diminishes with distance. Light follows the inverse square law: doubling the distance from the source reduces intensity by 75%. A light 6 inches above a plant delivers four times the intensity of the same light at 12 inches.
Measure the growing area first. A single 2-foot LED panel typically covers a 2×2-foot footprint adequately. For a 4-foot shelving unit, two 2-foot fixtures or one 4-foot fixture provides even coverage. Plants at the edges of the lit area receive less intensity than those in the center, so avoid overcrowding.
Adjust height based on plant type:
- High-light plants (succulents, herbs, fruiting vegetables): 6–12 inches from LED panels.
- Medium-light plants (most tropical foliage): 12–18 inches.
- Low-light plants (pothos, snake plants, ferns): 18–24 inches.
If leaves show signs of bleaching, curling, or heat stress, raise the light. If plants stretch or grow leggy, lower it or increase the fixture wattage.
Account for obstructions. Reflective surfaces (white walls, aluminum foil, or purpose-made reflective film) can boost efficiency by redirecting stray light back toward plants. Dark or matte surfaces absorb light and reduce coverage.
For multi-tiered shelving, use adjustable chains or ratchet hangers to suspend lights. This allows for easy height changes as plants grow. Fixed-mount lights work for permanent setups but lack flexibility.
Safety note: Ensure fixtures are rated for damp or humid environments if growing in a bathroom, basement, or any space with elevated moisture. Most grow lights are splash-resistant but not waterproof. Keep electrical connections and power strips off the floor and away from water sources.
Essential Equipment and Materials You’ll Need
Gathering the right components upfront prevents mid-project runs to the hardware store. Here’s a complete list for a standard setup.
Lighting equipment:
- Grow light fixture(s) sized for the growing area (LED, T5, or other).
- Adjustable hangers or chains (if suspending lights).
- S-hooks or carabiners for easy height adjustment.
Electrical and control:
- Digital timer (mechanical timers work but digital units offer more precise scheduling and multiple programs).
- Power strip with surge protection (one with mounting holes makes installation cleaner).
- Extension cord rated for the total wattage (if the outlet isn’t conveniently located).
Mounting and support:
- Shelving unit or grow rack (wire shelving works well: allows airflow).
- Eye hooks or ceiling mounts (if suspending lights from above).
- Zip ties or cord organizers (to manage cables and keep things tidy).
Optional but useful:
- Light meter or PAR meter (measures actual light intensity: smartphone apps offer basic functionality).
- Reflective material (Mylar film or white poster board to line walls and increase efficiency).
- Small fan (improves air circulation, strengthens plant stems, and prevents fungal issues).
Safety gear:
- Safety glasses (when drilling or mounting overhead fixtures).
- Step stool or ladder (for ceiling-mounted installations).
Most growers can build a functional single-shelf setup for $100–$200, including lights, timer, and basic hardware. Expanding to multiple shelves or larger areas scales costs proportionally.
Before purchasing, verify the electrical draw doesn’t exceed outlet capacity. A standard 120V, 15-amp circuit supports roughly 1,800 watts, but it’s wise to stay below 80% of that (1,440 watts) to avoid tripping breakers, especially if other devices share the circuit.
Step-by-Step Installation Process
This process assumes a shelving-based setup, the most common configuration for home growers. Adjust steps as needed for ceiling-mounted or clamp-on fixtures.
1. Assemble and position the shelving unit. If using wire shelving, ensure it’s stable and level. Place it in a location with access to a grounded outlet and away from high-traffic areas where it might get bumped. Leave enough clearance above the top shelf if lights will be suspended.
2. Install mounting hardware. For suspended lights, screw eye hooks into the underside of the shelf above, spacing them evenly to match the mounting points on the light fixture. If the shelving has pre-drilled holes or a grid pattern, use those for alignment. For ceiling mounts, locate joists with a stud finder and install heavy-duty eye hooks or ceiling anchors rated for at least twice the fixture’s weight.
3. Attach adjustable hangers. Thread lightweight chain or adjustable rope ratchets through the eye hooks. S-hooks or carabiners at the bottom let you quickly change light height without disassembling the setup. Some LED panels come with hanging kits: use them if included.
4. Hang the grow light. Suspend the fixture at an initial height appropriate for the plants (refer to spacing guidelines above). Ensure it’s level, an uneven light creates uneven growth. Tighten connections so the fixture doesn’t sway.
5. Route power cables neatly. Run the light’s power cord along the shelving frame, securing it with zip ties or adhesive cable clips. Plug it into the timer first, then plug the timer into the power strip. This setup lets the timer control the light schedule. Keep cables clear of areas where water might collect.
6. Test the system. Manually switch the timer to the “on” position and verify the light operates. Check for flickering, unusual noise, or overheating. If everything functions correctly, set the timer schedule (covered in the next section) and let it run.
7. Add finishing touches. If using reflective material, line the back and sides of the shelving unit to maximize light efficiency. Position plants on the shelf, spacing them to avoid crowding. Add a small clip-on fan if air circulation is poor.
Safety check: Ensure no cords are pinched, stretched taut, or resting against hot surfaces. Verify the power strip is secured and won’t be knocked loose. For setups in damp areas, confirm all electrical connections are above potential water sources.
The whole installation typically takes 30–60 minutes for a single shelf, longer for multi-tier systems. Having a second person to hold fixtures while you secure hardware makes the job easier, but it’s manageable solo with patience.
Setting Timers and Adjusting Light Duration
Plants use light duration (photoperiod) as a signal for growth phases and flowering. Getting the schedule right matters as much as choosing the correct fixture.
General guidelines by plant type:
- Vegetative growth and foliage plants: 12–16 hours of light per day. Most houseplants, herbs, and leafy greens thrive in this range.
- Flowering or fruiting plants: 12–14 hours during vegetative growth, then 10–12 hours to trigger blooming (though many houseplants don’t require photoperiod manipulation).
- Succulents and cacti: 12–14 hours, mimicking long desert days.
- Low-light tolerant plants: 8–10 hours minimum: can handle 12–14 without issue.
Consistency is critical. Erratic schedules stress plants and disrupt circadian rhythms. A digital timer eliminates guesswork, set it once and let it run. Most models offer daily programming or separate weekday/weekend schedules, though plants don’t take weekends off.
Programming the timer: Plug the timer into the power strip, then plug the grow light into the timer. Set the current time on the timer, then program the “on” and “off” times. For example, a 14-hour schedule might run from 7:00 AM to 9:00 PM. This mimics a natural day and keeps the lights off during sleeping hours, reducing the “bedroom greenhouse” effect of bright lights at midnight.
Monitor plant response. After two weeks, check for signs the schedule needs adjustment:
- Stretching or pale growth: Increase duration by 1–2 hours or lower the light.
- Leaf burn or bleaching: Reduce duration slightly or raise the light.
- Slow growth but healthy color: The plant may need more intensity, not more hours. Lower the light first before extending the schedule.
Some growers reference resources like Better Homes & Gardens for plant-specific care sheets that list ideal light durations. Others use trial and error, adjusting based on how plants respond.
Adjust for seasons. Even indoors, some plants benefit from a slight reduction in light hours during winter to simulate dormancy. Tropicals from equatorial regions prefer consistent 12-hour schedules year-round.
Don’t skip the timer, manually switching lights leads to missed days, irregular schedules, and forgotten lights left on for 24+ hours. A $15 timer is cheap insurance against those mistakes.